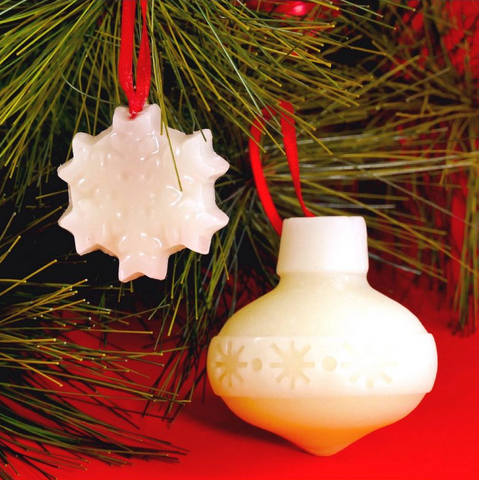
Easy, beautiful, and fun - these DIY beeswax ornaments are the perfect family craft. They wax and molds might look elaborate, but they come together in just a few steps! Throw on some holiday music, heat up some hot cocoa, and make some memories, starting with a few homemade decorations.

DIY BEESWAX ORNAMENT MATERIALS
Step 1: Put your wax in your double boiler to melt it.
Step 2: While your wax is melting, prepare your mold and ribbon. Put your mold in a baking pan in the event you have any wax spill over the top. Then cut off a length of ribbon about 12″ long, knot the end, trim off the excess ribbon beneath the knot. Set the ribbon aside for now.
Step 3: Slowly pour your melted wax into the mold. Depending on your mold, you may need only to fill it up partway, or you may need to go all the way to the top for the full effect. If you need to fill it up all the way, avoid going over the edges.
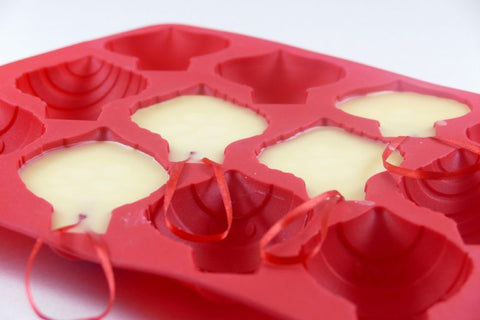
Step 4: Place your prepared ribbon into the wax. Your goal is to get the knot covered by the wax, but not go all the way to the base of the mold to avoid having it show on the other side.
Step 5: If your ribbon doesn’t want to stay in place, set something near it that’s a little taller to keep it in place for you. (I used our giant 20-sided die.)
Step 6: Wait for it to cool and solidify before removing your beeswax ornament from the mold. Wax gets lighter and opaquer as it cools, so you can tell when it is solidified. You can tell when the wax is ready by how it pulls away from the mold. Gently pull the wax out of the mold, but do not pull on the ribbon yet (it needs more time to set in there).
And that's it!
*This cool craft idea comes from the talented, Jennifer of JenniferMaker.com. Check out her DIY Beeswax Ornaments for Gift-Giving and Sewing and her other crafty posts!
Sign up for the latest recipes, discounts and more
© 2026 Cloister Honey


